Introduction
This is a simple tutorial on how to run Tensorflow 2.0 example jupyter notebooks in a docker container environment. If you are new to Docker, it is a fantastic tool for developing reproducible applications. This post will not be an indepth tutorial to Docker, if you are interested in an introduction, see https://docs.docker.com/get-started/—I will do a tutorial post soon.
One major benefit of Docker is the ability to share and replicate your development environment with collaborators (and to avoid getting stuck in dependency hell). Assuming your collaborators have Docker (and Docker Compose, if required), standing up an identical and isolated development environment only requires running a few commands!
As data scientists, it is common for us to exclusively live in Jupyter notebooks (for better, or for worse) to perform a variety of tasks—from exploratory data analysis, preprocessing, training, etc. Additionally, we want to ensure our Jupyter environment has the proper dependencies to perform our analysis.
Note: None of these Tensorflow tutorials are my own, they are all available on Tensorflow. The goal of this repository is to replicate these tutorials in a dockerized environment for educational purposes. Any modifications to the content will be indicated accordingly.
Docker Compose Configuration File
In this tutorial, we are keeping things simple. We will first start by creating a docker-compose.yml file. Generally, these files are used to specify the various services you would like for Docker to stand up—if you are dealing with a multi-container environment. In this example, our docker-compose.yml will only contain a single service, however this serves as an example of how to include a simple jupyter server to another docker stack.
version: "3.7"
services:
  tf-jupyter:
    image: jupyter/tensorflow-notebook:latest
    environment:
      - JUPYTER_TOKEN=jupyter
    volumes:
      - ./tutorials:/tf/tutorials
    working_dir: /tf/tutorials/
    ports:
      # Jupyter port
      - "8888:8888"
      # Tensorboard port
      - "6006:6006"
Let’s break things down line-by-line.
First version: "3.7" specifies the version of docker-compose to use. At a high level, different versions of docker-compose have different parameters you can specify.
Second, we define the various services to stand up, however since we only have a single service, we only see a single entry. If wanted multiple services, your file may look like:
version: ...
services:
  service-a:
    ...
  service-b:
    ...
  service-c:
    ...
  ...
Next, we define our service Jupyter notebook service. We start by defining the “image” to start from.
image: jupyter/tensorflow-notebook:latest
As a reminder, an image contains a frozen copy of a development environment. In this example, we are starting from an environment created by the Jupyter team that comes pre-installed with a lot of useful tools for running Tensorflow code. What this line is saying is start from the tensorflow-notebook image made by jupyter, and specifically, grab the latest version of this environment—you can also specify specific versions.
Optionally, we can define environment variables for the container.
environment:
  - JUPYTER_TOKEN=jupyter
In this example, we defining a single environment variable called JUPYTER_TOKEN. If you aren’t familiar with Jupyter, this is essentially a password to access the server. So here, we are setting the password to jupyter—in another post I show you a tip for securing your environment variables. Again, this is optional. If you remove this section of the config, Jupyter will start with no password required.
volumes:
  - ./tutorials:/tf/tutorials
Here we “mount” a volume, which essentially means “copy” files from your local machine to a specific directory in the container (whether or not it exists). Above, we mount the entire tutorials folder into a directory called /tf/tutorials. Note, this directory does not exist in the container, we are instructing docker-compose to make this directory and copy the contents to it. This way, we can access our notebooks from the container and our changes persist upon spinning down the container.
working_dir: /tf/tutorials/
This tells docker-compose to cd us into the /tf/tutorials/ directory upon entering it.
ports:
  # Jupyter port
  - "8888:8888"
  # Tensorboard port
  - "6006:6006"
For this container, we would like to start up two servers, one for Jupyter notebook and another for Tensorboard (if we elect to use it). In order for our local computer to actually access these servers, we must specify the port(s) to expose. Here we tell Jupyter to be accessible on port 8888 by the host (our local computer) and run on port 8888 within the container. What this implies is that we can forward the port to another, if there are port conflicts. Simiarly, for tensorboard, we expose 6006.
And that’s it for the configuration file!
How to Run Your Container(s)
Now here is the time to show the power of Docker. Assuming you are cd‘d into the proper directory, if you run from a terminal/command prompt:
docker-compose up
Docker will start up a service called tf-jupyter.
Creating network "tf_tutorials_default" with the default driver
Creating tf_tutorials_tf-jupyter_1 ...
If this is your first time running the command, it will take a while to execute as it is downloading all of the required dependencies. Note, the next time you run this command, you will not have to wait as long.
After everything downloads, you should finally see the following in your terminal:
tf-jupyter_1  | [I 2021-04-09 04:01:24.038 LabApp] JupyterLab application directory is /opt/conda/share/jupyter/lab
tf-jupyter_1  | [I 04:01:24.043 NotebookApp] Serving notebooks from local directory: /tf/tutorials
tf-jupyter_1  | [I 04:01:24.043 NotebookApp] Jupyter Notebook 6.2.0 is running at:
tf-jupyter_1  | [I 04:01:24.043 NotebookApp] http://23b09491f9c6:8888/?token=...
tf-jupyter_1  | [I 04:01:24.043 NotebookApp]  or http://127.0.0.1:8888/?token=...
tf-jupyter_1  | [I 04:01:24.043 NotebookApp] Use Control-C to stop this server and shut down all kernels (twice to skip confirmation).
You now have a Jupyter notebook server running! If you visit localhost:8888 in your browser, you will arrive on this page:
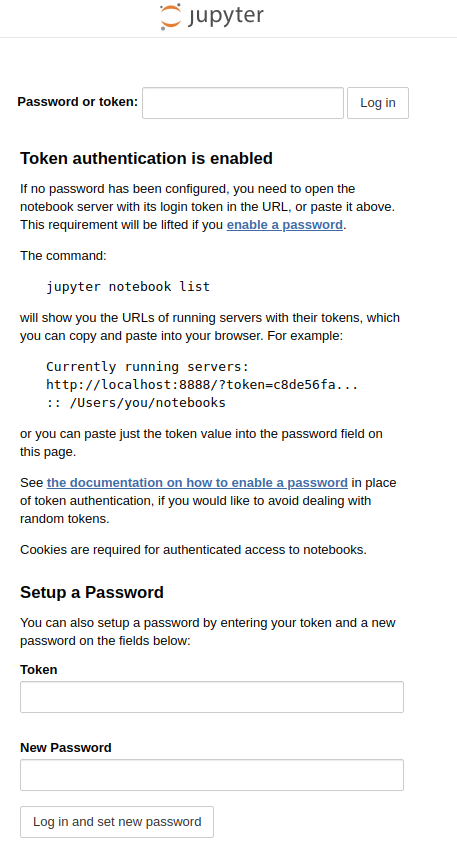
Recall, the password/token for this Jupyter server is jupyter (defined in the environment variables). Upon logging in, you’ll arrive at the usual Jupyter notebook screen.

Running the Tensorflow Example Notebooks
You can then create and execute your Jupyter notebooks like normal, for example, here is the Tensorflow 2 Quickstart for Beginners example from Tensorflow.
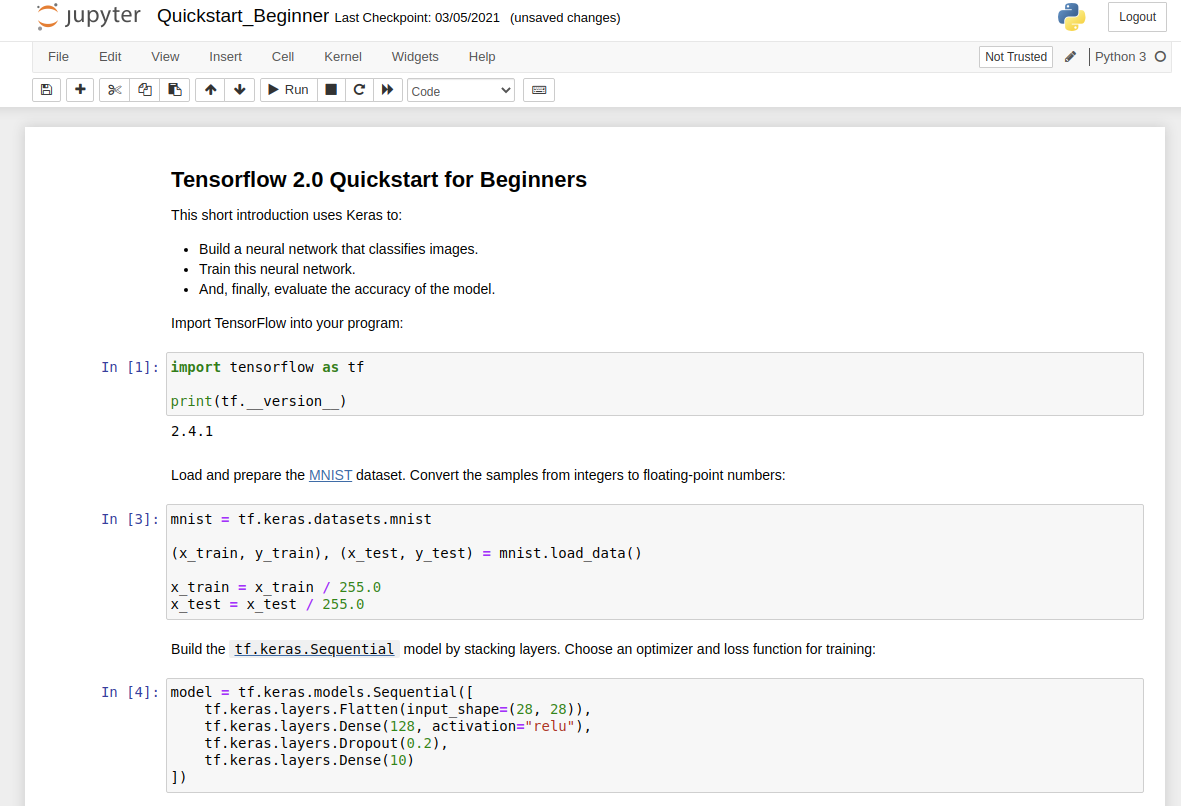
Additionally, you can see we already have tensorflow installed. As of 2021-04-09, the following dependencies are included in the jupyter/tensorflow-notebook:latest image:
(base) jovyan@53e0be54cffe:/tf/tutorials$ pip list
Package                       Version
----------------------------- -------------------
absl-py                       0.11.0
alembic                       1.5.5
anyio                         2.2.0
appdirs                       1.4.4
argon2-cffi                   20.1.0
astunparse                    1.6.3
async-generator               1.10
attrs                         20.3.0
Babel                         2.9.0
backcall                      0.2.0
backports.functools-lru-cache 1.6.1
beautifulsoup4                4.9.3
bleach                        3.3.0
blinker                       1.4
bokeh                         2.2.3
Bottleneck                    1.3.2
brotlipy                      0.7.0
cached-property               1.5.1
cachetools                    4.2.1
certifi                       2020.12.5
certipy                       0.1.3
cffi                          1.14.5
chardet                       4.0.0
click                         7.1.2
cloudpickle                   1.6.0
conda                         4.9.2
conda-package-handling        1.7.2
cryptography                  3.4.4
cycler                        0.10.0
Cython                        0.29.22
cytoolz                       0.11.0
dask                          2021.2.0
decorator                     4.4.2
defusedxml                    0.6.0
dill                          0.3.3
distributed                   2021.2.0
entrypoints                   0.3
flatbuffers                   1.12
fsspec                        0.8.7
gast                          0.3.3
gmpy2                         2.1.0b1
google-auth                   1.27.1
google-auth-oauthlib          0.4.3
google-pasta                  0.2.0
grpcio                        1.32.0
h5py                          2.10.0
HeapDict                      1.0.1
idna                          2.10
imagecodecs                   2021.1.28
imageio                       2.9.0
importlib-metadata            3.7.0
ipykernel                     5.5.0
ipympl                        0.6.3
ipython                       7.21.0
ipython-genutils              0.2.0
ipywidgets                    7.6.3
jedi                          0.18.0
Jinja2                        2.11.3
joblib                        1.0.1
json5                         0.9.5
jsonschema                    3.2.0
jupyter-client                6.1.11
jupyter-core                  4.7.1
jupyter-packaging             0.7.12
jupyter-server                1.4.1
jupyter-telemetry             0.1.0
jupyterhub                    1.3.0
jupyterlab                    3.0.9
jupyterlab-pygments           0.1.2
jupyterlab-server             2.3.0
jupyterlab-widgets            1.0.0
Keras-Preprocessing           1.1.2
kiwisolver                    1.3.1
llvmlite                      0.35.0
locket                        0.2.0
Mako                          1.1.4
mamba                         0.7.14
Markdown                      3.3.4
MarkupSafe                    1.1.1
matplotlib                    3.3.4
mistune                       0.8.4
mock                          4.0.3
mpmath                        1.2.1
msgpack                       1.0.2
nbclassic                     0.2.6
nbclient                      0.5.3
nbconvert                     6.0.7
nbformat                      5.1.2
nest-asyncio                  1.4.3
networkx                      2.5
notebook                      6.2.0
numba                         0.52.0
numexpr                       2.7.2
numpy                         1.19.5
oauthlib                      3.0.1
olefile                       0.46
opt-einsum                    3.3.0
packaging                     20.9
pamela                        1.0.0
pandas                        1.2.3
pandocfilters                 1.4.2
parso                         0.8.1
partd                         1.1.0
patsy                         0.5.1
pexpect                       4.8.0
pickleshare                   0.7.5
Pillow                        8.1.1
pip                           21.0.1
pooch                         1.3.0
prometheus-client             0.9.0
prompt-toolkit                3.0.16
protobuf                      3.15.4
psutil                        5.8.0
ptyprocess                    0.7.0
pyasn1                        0.4.8
pyasn1-modules                0.2.8
pycosat                       0.6.3
pycparser                     2.20
pycurl                        7.43.0.6
Pygments                      2.8.0
PyJWT                         2.0.1
pyOpenSSL                     20.0.1
pyparsing                     2.4.7
pyrsistent                    0.17.3
PySocks                       1.7.1
python-dateutil               2.8.1
python-editor                 1.0.4
python-json-logger            2.0.1
pytz                          2021.1
PyWavelets                    1.1.1
PyYAML                        5.4.1
pyzmq                         22.0.3
requests                      2.25.1
requests-oauthlib             1.3.0
rsa                           4.7.2
ruamel-yaml-conda             0.15.80
ruamel.yaml                   0.16.12
ruamel.yaml.clib              0.2.2
scikit-image                  0.18.1
scikit-learn                  0.24.1
scipy                         1.6.0
seaborn                       0.11.1
Send2Trash                    1.5.0
setuptools                    49.6.0.post20210108
six                           1.15.0
sniffio                       1.2.0
sortedcontainers              2.3.0
soupsieve                     2.0.1
SQLAlchemy                    1.3.23
statsmodels                   0.12.2
sympy                         1.7.1
tables                        3.6.1
tblib                         1.6.0
tensorboard                   2.4.1
tensorboard-plugin-wit        1.8.0
tensorflow                    2.4.1
tensorflow-estimator          2.4.0
termcolor                     1.1.0
terminado                     0.9.2
testpath                      0.4.4
threadpoolctl                 2.1.0
tifffile                      2021.2.26
toolz                         0.11.1
tornado                       6.1
tqdm                          4.58.0
traitlets                     5.0.5
typing-extensions             3.7.4.3
urllib3                       1.26.3
vincent                       0.4.4
wcwidth                       0.2.5
webencodings                  0.5.1
Werkzeug                      1.0.1
wheel                         0.36.2
widgetsnbextension            3.5.1
wrapt                         1.12.1
xlrd                          2.0.1
zict                          2.0.0
zipp                          3.4.0
Note, you can do this a few ways, but here are a couple of options:
- Create a terminal in the Jupyter server and execute
pip list - From your command prompt, run
docker-compose run tf-jupyter pip list
Additionally, since you mounted your notebook directory, all changes made within the container should presist to your local copies. However, warning, if you write to unmounted directories, your changes will disappear when you exit the container.
Spinning Down Your Container
When you are done with your jupyter container, ctrl+c the terminal where you ran the docker-compose up, and you’ll see the following prompt.
Gracefully stopping... (press Ctrl+C again to force)
Stopping tf_tutorials_tf-jupyter_1 ...
Killing tf_tutorials_tf-jupyter_1  ... done
To ensure the containers fully stop gracefully, execute:
docker-compose down
Link to Repository
For the full code for this tutorial see: